Showing posts with label Kids. Show all posts

Dream Catcher


Dream Catchers


Gosh I love Dream Catchers.  I don’t know, maybe it’s the mystical, maybe it’s the romance, maybe it’s just the wish.  But whatever, I love them.  I’ve even made a few of late.


So when One of my gorgeous nieces had her birthday in April, I decided I just had to make a card using a Dream Catcher die from my stash and I had found a gorgeous card on Pinterest for inspiration.  Click here for the link!


But here’s my card to share today:
Stamp Set: Watercolour Wash
Papers: Whisper White CS
Inks: Blushing Bride, Gold
Other: Sequins, Gold Embossing Powder & Liquid Pearls

My Super Hero

Well, the month of June is birthday month around here.  And we've finally made it through to the end.  With two of my three children born in the same week of June, it sure makes for busy times.  But it's over now, birthday cakes are eaten, birthday parties are now a memory and time to share some of the birthday cards I made.

The first is for my big boy, turning the grand old age of 12!  And I thought a super hero card would be perfect for him!!


I used Cherry Cobbler CS for my base, and sprayed Cherry Cobbler ink over the card using the sunburst stencil from the Hip Hip Hooray kit (from the now retired 2014 Catalogue).  When the ink was dry, I used my Cricut and a mask cutting file to create the mask!


I added a couple of stars cut from Crushed Curry cardstock with some of my little star punches.  You can see the solid yellow star is the inner of the larger star.  Clever, huh?  I've stamped over the little star with dots using Crushed Curry ink (and now I can't remember which stamp I used).


I added a Whisper White CS strip and stamped a cool birthday sentiment (non SU stamp) and the card was done!  Voila!  And yes, the card was much admired by ALL the boys in my family!!

Birthday Batman

Na Na Na Na Na Na Na Na Na Batman.  Holy smokes its a Batman card!!  And so completes my 'week' of boy themed cards!!

I actually used the Batman card as a birthday card for my son Matthew as well as making a couple to have on standby!  When you're using the Cricut (or other electronic paper cutter) you might as well make a few of them!!


This card was a really fun card to make.  I used my Cricut to cut the Batman image (from a digital cut file) and my Oval Famelits to cut the background of Daffodil Delight (yellow) & Basic Black Cs.


I used a variety of blue-coloured card bases, added a white embossed background and a strip of contrast and the card was almost done.


 All it needed was a birthday sentiment, and I always use a basic one for boys.


And Holy Smokes, Batman.  The card was done!!

xx

Controller card!

So yesterday I shared my first  male-themed card, so here's another one for inspiration!

This card features a card front/stamped image coloured in by a lovely friend of mine.  I'm not sure what stamp this was from, or if it was just a digi-image - but another card perfect for teenage boys.

This time, I used some DSP (my friend's son who received this card loves purple!!), a card base of Crumb Cake CS which I had embossed with diagonal stripes and some photo corners punched from Basic Black CS.


Again, a basic Happy Birthday sentiment keeps the card nice and simple, and no way at all fussy for the boys!  Especially teenage ones, where you cannot be cutesy!!


This card was coloured in with a mix of Copic markers and Stampin' Up! blendabilities which unfortunately are no longer available.  But if you love colouring, google or search pinterest - heaps of digi-images!!

xx

Cards for the Boys

So it's Easter Monday, and I'm going to try and catch up on sharing my projects!!  Going through this blog, I see I've been a bit slack at sharing.  A time thing really, I'm making the cards but not finding the time to share.

So let's see how I go this week, making and sharing.  Think I'll make this week about the boys!  Starting with a card perfect for teenage or pre-teenage boys!


I found a digital cut file for the 'HUH'.  So apt don't you think.  I think this will be a standby design now that I have an eleven year old son, with friends all turning twelve and so on!!

I used boy-friendly colours: Real Red, Crumb Cake and Basic Black.  Very safe, don't you think!

Add some Washi tape, staples and a birthday sentiment.  Yep the card was done.  And my nephew who received this card thought it was hilarious!!

Hope this card inspires easy, not-fussy, male themed cards!

xx

Fairy Wings

Well, it's been so long since I blogged one of my own projects, that I thought I would jump in and immediately share a project I made today.  Yes!  Today!

Today my gorgeous little girl was invited to a fairy birthday party.  So of course, I needed a fairy birthday card.

Lacking time and maybe a little bit of inspiration, I grabbed one of my Fairy dies and got to work!


Isn't she sweet!  The die was the Spellbinders Fairy Cierra die and my little Jess loved her.  I cut her from Basic Black CS and jazzed up her wings with a little Dazzling Diamonds.  The glue hadn't quite dried for this pic, so the wings still look a bit overly done!!


I used Whisper White & Melon Mambo CS for my card and a little bit of my favourite DSP from last years collection.  Die cut them with circles and scallop circle framelits and the easy part was done!


Yep, I really liked this card.  Wish I had thought to make a few of them.  I'm learning its always handy to have birthday cards, especially for kids, on stand by!

Here's what I used:
Stamps: Express Yourself
Inks: Basic Black
Papers: Whisper White, Melon Mambo, Basic Black CS and DSP
Big Shot: Fairy Cierra and Scallop Circles (Spellbinders) & Circles (SU)
Accessories: Dazzling Diamonds

Enjoy xx

A sharky tale

So this card is on it's way with me to Melbourne.  I'm heading to Melbourne tomorrow to attend Stampin' Up!s annual convention!  So it is with pleasure to bring this card I made for my nephew who celebrated his birthday last week.  Maybe it can even be hand-delivered!

I used a fair few bits and pieces for this one.  I also used my Cricut, using a few SVG files that I purchased from Miss Kate Cuttables.  So lets begin!

I cut the shark, from Marina Mist, Basic Black, Whisper White & Real Red CS.  Nice bright colours for a shark I thought.  I pieced him together and then adhered him to an oval cut from corrugated cardboard that I had in my stash for a one day use!

 
I die-cut a few waves from various scraps of DSP I had in my one-day box.  I also cut a number seven for the all important birthday!  Add a few black pearls for eyes, and my sharky shark was done!


I used a Whisper White card front, stamped Happy Birthday and then used Crumb Cake as the card base.  A perfect card for a seven year old boy, not too fussy, not too girly and maybe even a little bit cool!

So here's what I used:

Stamps: Express Yourself
Inks: Basic Black
Papers: Whisper White, Real Red, Basic Black & Marina Mist CS, corrugated cardboard
Accessories: black pearls
Cutters: Cricut and SVG files

Enjoy xx

Shaggy Dudes

So another kid's card today.  This card is for my son's friend and totally inspired by a creation I found on Pinterest.

Unbelievably this card uses the Simple Stems stamp set.  Can you believe it?  A boys card from a floral stamp set?  Who knew!  So time to show and tell!

Introducing the Shaggy Dudes!


The Simple Stems stamp set is from the latest and new Occasions (Mini) Catalogue and is a gorgeous stamp set.  I've used the silhouette stamp to create these little shaggy dudes.  So cute.  I stamped them in Smokey Slate, Crushed Curry and Bermuda Bay inks onto a 9.5cm square of Whisper White.  I added them to my embossed Basic Black background using silver brads.  (Gosh, it's been a while since I've used brads...).


And of course you just have to add googly eyes for these little dudes.  I set them close together, a little apart or just one bigger googly eye.  Cute!
 

I've used my Itty Bitty Banners stamp set for my birthday sentiment, with a background of Soft Suede and popped up with dimensionals.  I couldn't decide where to put the number 7, after all it was a young boy's birthday card.  In the end, I left it as is.

To make this card, I used the following:

Stamps: Itty Bitty Banners & Simple Stems
Inks: Basic Black, Smokey Slate, Crushed Curry & Bermuda Bay
Papers: Basic Black, Whisper White & Soft Suede CS
Accessories: Googly Eyes & silver brads
Big Shot: Stylish Stripes Embossing Folder.

And you can find the original creation here.

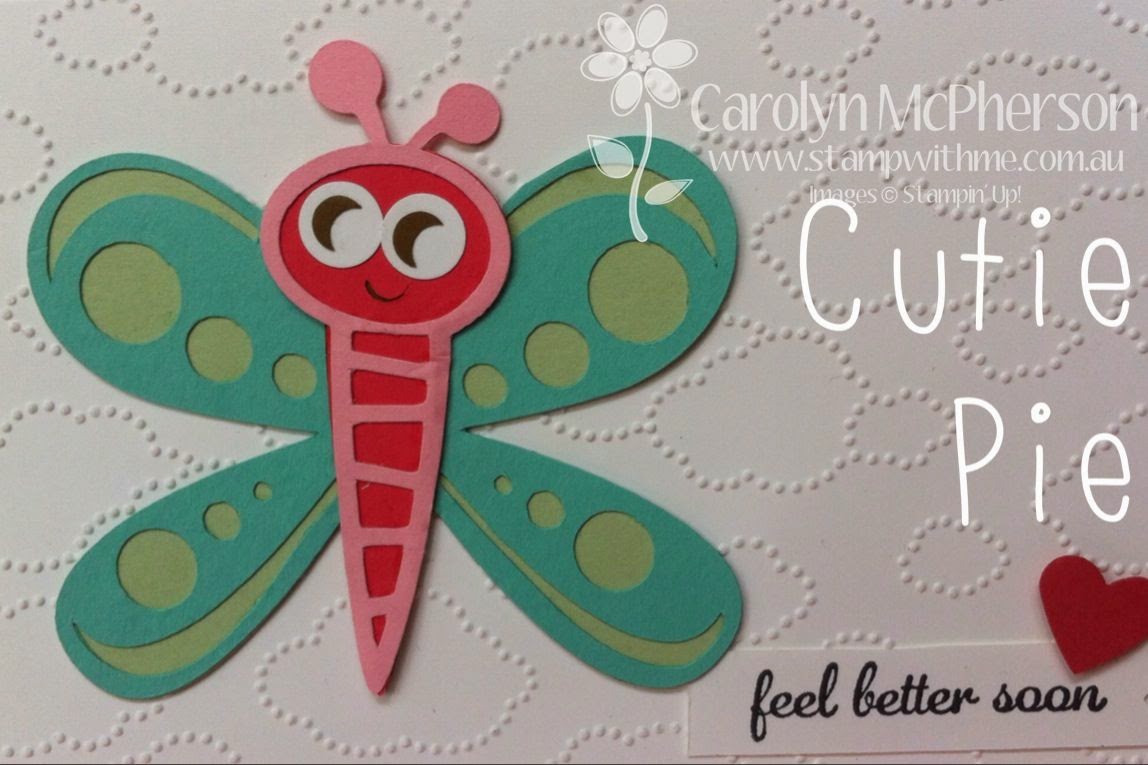
Cutie Pie

Don't you just love colour?  I love all the pretty pastel shades that are part of Stampin' Up!s newest In Colour collection.  In fact, I'm trying to introduce the colour combination within my house of crisp white with the prettiest shades of blue/green/mint.  Think Tiffany blue or the blue of my favourite dress shop - Blue Illusion.  So its with so much pleasure to play with the In Colour collection!

This week I made a card featuring the new colours of Pool Party, Pistachio Pudding and Strawberry Slush.  These colours look gorgeous with white.  So pretty!  And so does this card!


Isn't this little butterfly cute?  In fact, I've renamed her Cutie Pie!  I found her over at Miss Kate Cuttables, a website specialising in SVG designs.


In addition to the colours mentioned above, I also used Pretty in Pink for the top body layer and Soft Suede for the eyes.

I put my Cutie Pie on a background of Whisper White that I had embossed with the Cloudy Day Embossing Folder.  I love the little cloud imprints for the back ground.


This card was for a little girl, so I added a little sentiment and a heart that I had left over from my Embellishment making day.  All in all, a pretty little card for a pretty little girl.  Well I think so anyway!

And as a little bit of trivia, I googled the definition of Cutie Pie:

cutie pie

noun Informal.
1.
darling; sweetheart; sweetie (often used as a term of endearment). 
 
 
And I think it is rather fitting!

So here's what I used:
Stamps: Express Yourself
Inks: Basic Black
Papers: Whisper White, Strawberry Slush, Pistachio Pudding, Coastal Cabana, Pretty in Pink, Soft Suede & Raspberry Ripple (heart)
Accessories: Big Shot & Cloudy Day Embossing Folder, small heart punch.


Skater card

So after a week of working afternoon shift and then the weekend, well the weekend kind of snuck up on me very very quickly.  As much as I love having the mornings home, I end up doing chores and catching up on things like grocery shopping and washing..... All my best intentions for crafting seem to go lower and lower on that to do list!!  So Friday arrived, it was 6pm and I still needed to make a birthday card for the following morning!!

So as dinner was cooking, I sat down and saw what supplies did I have ready to go.  It was kind of like a use up the scraps day.  I found a SVG cut of a boy on a skateboard and circle punches.  So I figure a skateboarder image needs a boy kind of stamp.  Gorgeous Grunge was perfect.  I chose some greens: Green Galore & Pear Pizzazz and some blues: Marina Mist and Pacific Point and set to work.


I was aiming for background stamping, but the splotches look kind of cool.  Its like the skater rose up from the splotches!  I also criss-crossed the lines over the card and scatter some dots around.


I stamped on a Whisper White matt and stamped a birthday sentiment.  This was then layered onto Marina Mist cardstock.  nice.

I used a scrap circle punched out of black and added a die cut number six and adhered to the edge trimming as necessary.  A bit of Tombow glue to stick down my skater and the card was done.  My boys thought the card was really cool - all that I was trying for.  Maybe a bit old for a 6 year old perhaps, but definitely a boy's sort of card.  Job done, card made.  Just in time for dinner.  Happy days!

Stamps: Gorgeous Grunge & Express Yourself
Inks: Basic Black, Pacific Point, Marina Mist, Green Galore & Pear Pizzazz
Papers: Marina Mist, Whisper White & Basic Black CS
Accessories: Cricut, Circle Punch, numbers die and Tombow glue.


To the Moon & Back

I always say my kids that I love them to the moon and back.  They love it and so do I, so when I needed to make a birthday card for a special little boy, I decided to use that as my theme and I think I'll use it later for a scrapbook theme too!


So I was totally inspired by a card I saw on Pinterest and got out my punches and started thinking.  Mainly thinking, that's a lot of punches!  Hmm.  Maybe there is an easier way!  Lets try the Cricut using my SCAL software.  Such a treat to have my Cricut working now!!  Firstly I started by making a large basic circle which I cut with the Cricut.  I then used a few of my small circle punches to cut out the 'craters' and sponged with a tiny bit of Crumb Cake ink.  I then adhered to the second circle which was left plain to make the moon!

I then started thinking about my little rocket flying to the moon.  I found a Rocket SVG file (which I can no longer find where I found it - was a freebie thanks to a google search).  Using my Cricut, I cut it from Pumpkin Pie CS and used scraps to make the features of the rockets.  Lots of little circles to adhere! My little rocket is propped up with Dimensionals.


 I've used my Daffodil Delight to make stars for the card and die cut the ric-rac edge from Pear Pizzazz CS.  A little birthday sentiment and the card was done.
 

This was a great card to make with the kids, they loved sticking all the stars and rocket bits together!

So here's what I used:
Stamps: Teeny Tiny Sentiments
Papers: Basic Black, Whisper White, Daffodil Delight, Pumpkin Pie & Pear Pizzazz
Inks: Basic Black
Punches: Circles, stars and hole punch
Big Shot: Ric Rac Die, Cricut & SCAL software

Fit for a Princess

I needed a card.  Quick.  Fit for a princess, well a fairy princess really.  Quickly.  Did I mention quick???

Over the last two week's I've been suffering with an upper back aggravation (of an old injury).  Sitting at a desk has been very difficult, and so my card making has suffered a little bit.  So I googled Handmade cards, using key words 'girl, fairy, princess, quick'.  And I found the perfect card!


I found some gorgeous cards based on a silhouette of a dress.  They kind of reminded me of the Princess cards I made a few months ago, but quicker :)

I used some bright pink card that I had in my stash, and drew the outline of the dress.  No tracing, no use of something circular, just from point to point (not too bad if I do say so myself!).

I cut a little slit on the fold of the card to insert a strip of satin ribbon (white - not that you can tell in the picture) and tied into a long sash.  I added sequins for the hem and little pearls for the top of the bodice.


Add a birthday sentiment and the card is done.  Told you it was quick!  Perfect for a little girl turning four having a fairy princess party.  Jess was most excited!!

The original card can be found here at madigan made. Enjoy!


Ninja Birthday

Well, yesterday I shared how busy the last few weeks have been.  One of those reasons was a fantastic one, we celebrated the birthday of my son Matthew who turned six!  So of course, as any paper-crafter mum would do, I made Matthew a birthday card!


 I couldn't think of what to make for him, so I decided to dust of the very dusty Cricut and cut a feature image for the card.  I decided to go the little ninja, as he's so cute!  My little Ninja is from the Lettering Delights - Ninja Kicks set and I chose this one from the many designs the set has.


I used my Penant Builder punch to make the bunting and I cut the little heart from Real Red CS using my Owl Builder Punch and the eyes were cut with the Crop-a-Dile.


I love how I can use all Stampin' Up! products and combine with a SVG cutting file when required, to find something just a little bit different.   I used the Big Shot to cut the number six.  I could have used the Cricut but sometimes everything is so much easier with dies and the wonderful Big Shot!!


I had to show this picture, as it features my beautiful little girl pointing to the ninja!! How cute!

Stampin' Up! supplies:
Stamps: Itty Bitty Banners
Inks: Basic Black
Papers: Basic Black, Very Vanilla, Real Red, Whisper White & Night of Navy CS.  Winter Frost DSP Stack
Accessories: Whisper White Bakers Twine, Owl & Pennant Punch

Lollipops!

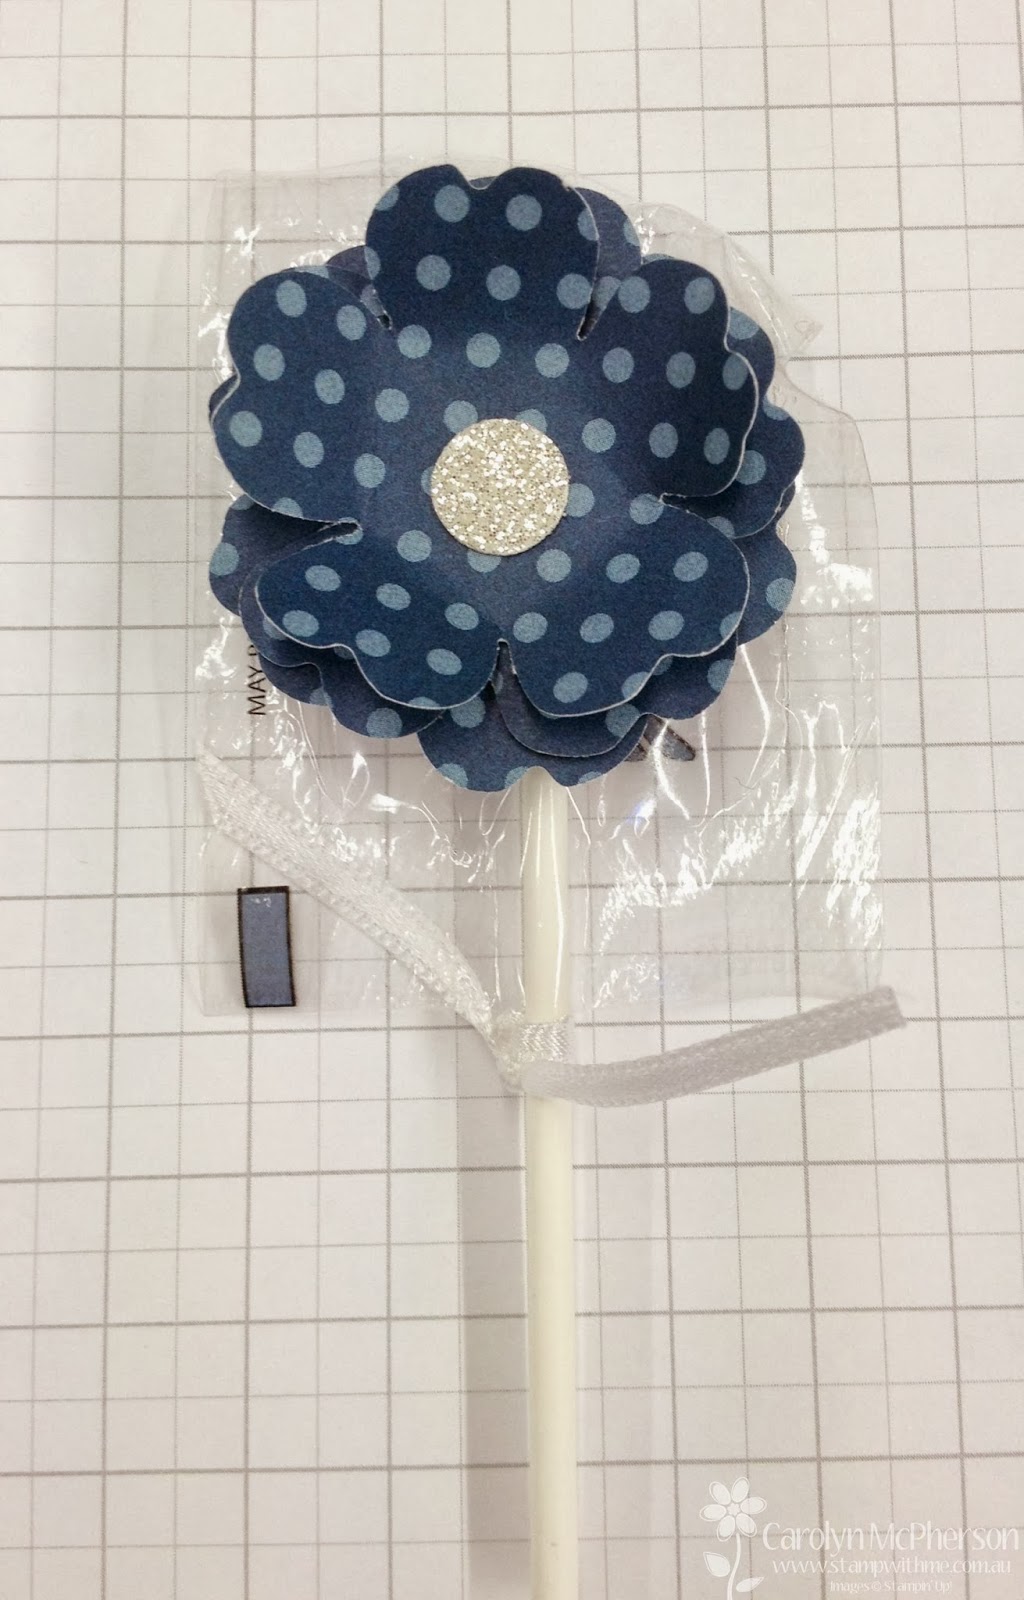
Just a quick but fun post today.  This project is just perfect for kids and a really fun holiday project.    All kids like lollipops right?  So guess what, you can make them look pretty too with scraps of paper and ribbon, and just a punch or two.


The lollipops that are flat and wrapped in plastic are the best for this little project.  It makes for very easy decorating.  Just a few glue dots and you'll hold it all in place.


I've used Gumball Green and Midnight Muse patterned papers from the Patterns Stack and cut them out with the Pansy punch.  I've used three layers with a glue dot in-between.


I've punched a little circle from a scrap of silver glimmer paper and added to the flowers.  Curl up the petals of the top flower and glue to the lollipop.


Add a piece of ribbon and you're done!  The kids love them and they make a great project for the kids at school, at parties, or just because!

Piggies

Well it's been a busy month for sure.  Can you believe we're already up to the last day of September.  Where did that go?  Where did the last 3 months go? And oh my goodness, Christmas is surely coming (there are Christmas things in the shops now!!).  So I've fallen behind on sharing the cards I made for a run of birthday parties my Matty was invited to.  We had the Minions & Evil Minions from Despicable Me and now this time, back to Angry Birds.  Well the Piggies!

Matty's friend loved Angry Birds, so it was back to the world of image surfing on Google.  Matty asked me to make a Piggies card, so that made it a little bit easier to narrow down our card choices.  We chose this one:


I pulled out all my green card stock for this one and settled on the colours of Wild Wasabi & Pear Pizzazz for the nose.


I've used the large circle die to cut the face, and assorted circle and oval punches to create the nose, eyes, ears and mouth.  Totally easy but an instant winner with the kids!


The card was finished with a birthday sentiment and really was a quick card to make.  You can find the making instructions (with video) over at this link at Stampintx.com.

So go on, give this card a whirl when you  need a birthday card for the kids in a hurry!  I used the following supplies:

Stamps: Itty Bitty Banners
Inks: Basic Black
Papers: Basic Black, Whisper White, Wild Wasabi & Pear Pizzazz CS
Accessories: Big Shot & Circle Die, Oval & Circle Punches


Koala Birthday Card

So the birthday run continues.  This time I had to make made a card for one of Jessica's little friends from childcare turning 3.  I wanted something cute.  Not Angry Birds, not Despicable Me or anything else the current range of boys.  So I decided to do some punch art. 


I've used the Koala punch art, sourced from the blog of Carolyn Bennie.  The koala is so cute and when I saw him doing a google image search, well I just fell in love!  I think I'm going to use the koala for Australian-themed Christmas cards to send overseas.  He's way too cute!

I made three little balloons from scrap pieces of blue cardstock.  I used the small oval punch and the owl punch (recognise the feet???) for the balloon and used Whisper White bakers twine for the balloon strings. 


White gel ink adds feature to the koala and the balloons.  So cute, so cute!


This card is actually a great one for using up scraps.  The birthday banner used scraps too!

So for instructions on the assembly of the koala,  head on over to Carolyn's blog.  Here's what I used:

Stamps: Itty Bitty Banners
Inks: Basic Black
Papers: Whisper White, Smoky Slate, assorted blues, retired Nursery Necessities DSP
Accessories: Whisper White Bakers Twine, Signo White Gel Ink pen
Punches: Bird Builder, Owl Builder, Small Oval, Circle punches, Word Window & Small Scallop Circle Punch

More Minions

On Sunday last week I shared my Despicable Me cards I had made for a couple of birthday parties.  My son Matthew loves Despicable Me minions, so when he had yet another party - well I decided to go for the 'evil' minion, the infected minion!  I haven't seen Despicable Me number 2 yet, so I'm looking forward to learning about these guys! My kids tell me this movie is hilarious and better than the first!!


For these 'evil' guys, I followed pretty much the same layout with the card base, adding the colour for the body and decorating as per the Minion way!  The 'evil' guys are purple, so I got to dig into my stash of purple of cardstock which is quite limited (sadly).  This card uses Lavender Lace, a retired colour from Stampin' Up! but still lovely!


The overalls are black and I've used grey brads for the straps this time!  I made the eye exactly the same way as the 'friendly' minions!  Just layered my circle sizes - grey, white, chocolate chip and black, and don't forget to use the white gel pen to add some feature to the eye!


I've used purple wool for the wild hair, and hand cut the mouth and teeth!  Child's play really!

So I hope you enjoyed this little guy too.  My kids sure did!

LinkWithin

Blog Widget by LinkWithin
Blogging tips