Showing posts with label Techniques. Show all posts

Boldly use Gold!

Stampin' Up! send their Independent Demonstrators lots of lovely inspiration.  And I really love this project.  The feature of GOLD is amazing!!

All about You
 
You don’t need a big image to make a bold statement on your project. With the Hello Love card shown here, the stamped “you” emphasizes that this card is all about the recipient. Use the stamping off technique, where you stamp an image multiple times before re-inking, to create a beautiful background. Plus our Greetings Thinlits create a fun focal point.

Project Supplies:
Stamps:You’re So Sweet Stamp Set
Papers: Shimmery White 8-1/2" x 11" Cardstock; Neutrals Color Collection Designer Series Paper Stack; Gold Foil Sheets; Basic Black Archival Stampin’ Collection Designer Series Paper Stack; Gold Foil Sheets; 
Inks: Basic Black Archival Stampin’ Pad and Hello Honey Classic Stampin’ Pad; Accessories: Metallics Sequin Assortment; Stampin’ Dimensionals; 
Big Shot: Mini Treat Bag Thinlits Dies

Festival of Tree Trio

Today's (and the final card for today) is a very special card that we made at our Christmas Avid Inkers meet up.  This card is beautiful, has a few neat cuts and folds, which all put together, makes a very clever little card.  I don't know if you call this a step card or a fancy fold card, or both!!

Thank you Annette for showing us this card!


Gorgeous cardstock colours of Whisper White and Cherry Cobbler.  With a touch of Pear Pizzazz.
 

This card uses hidden strips of acetate to hold the trees steady and upright.  Such a nifty idea, and you can barely see it!  The trick is to add the acetate in layers with the trees and Cherry Cobbler CS.   Took me a little while, but I did figure it out!!


The final pic, shows the fancy folds used in the card (you can also see I took the photo AFTER I wrote in it!!).  The folds look ok, the cuts were a little bit trickier.

I'm not sure where Annette found the inspiration for this card.  The closest one I could find on Pinterest!  If you want to make this card, let me know and I'll get the directions to you!

Well, now it's Christmas Eve.  No more chatter from me.  Christmas Eve is a special time.  Enjoy every moment.  Merry Christmas xx

Blendabilities


The wait is over! We've officially released one of our most exciting new products, Stampin' Blendabilities Markers! These exclusive, alcohol-based marker sets come in a three-pack of light, medium and dark shades (of the same colour) and provide your projects a more saturated look with blended colours.

We recommend using Whisper White Cardstock with your Stampin' Up! Blendabilities, but choosing any one of our cardstocks will add a unique look to your project.

And because traditional alcohol markers require a bit of training, we've developed a few videos to ensure that Blendabilities are easy-to-use for everyone! You can visit www.youtube.com/user/stampinupvideo to view them.

Click here for all the info!


Available Products to order now:
  • Cherry Cobbler (Item 130995 - $20.95)
  • Coastal Cabana (Item 131000 - $20.95)
  • Daffodil Delight (Item 130998 - $20.95)
  • Old Olive (Item 130999 - $20.95)
  • Pumpkin Pie (Item 130997 - $20.95)
  • Rich Razzleberry (Item 131003 - $20.95)
  • Skin Tone Assortment (Item 129370 - $39.95)
  • Memento Ink Pad (Item 132708 - $9.95)
  • Memento Ink Refill (Item 133456 - $8.95)
  • Color Lifter (Item 129369 - $8.95)
What Sets Them Apart:

  • The Stampin' Up! rectangular barrel keeps your markers from rolling away!
  • Flat storage helps to maintain the life of each marker.
  • Each marker comes with a tip on each end: brush and fine.
  • Marker tips are made of nylon, which is superior to polyester which can fray.
  • Colour-coded caps.
  • Stampin' Up! markers coordinate wonderfully with our cardstock and can be used with transparent sheets.
More colours will be available to order from 1 August 2014. Contact me and I'll show you all you need to know about these markers!

Scallop Tag Punch Card 2

So yesterday I shared my first version of the popular Scallop Tag Punch Card, so I thought I would give it another go (I had another piece of Pool Party CS to use!!) and see how I could mix it up a bit!


So I opened my Fresh Prints DSP Stack (Oh no, I hate doing that!!) and selected this gorgeous leaf patterned print which used the colours of Pool Party, Soft Suede and Real Red.  A gorgeous colour combo!


I stamped my flowers in coordinating inks: Real Red, Pool Party and Crumb Cake.  I glammed up each flower with some Dazzling Diamonds in the centres - so pretty!


I've added some leaves cut with my Bird Builder punch from Soft Suede CS, added a sentiment and a bow from Crumb Cake Taffeta ribbon and the card was complete.  Really pretty and I really loved the colour combinations too!


So this time I used:

Stamps: Flower Shop & Express Yourself
Inks: Basic Black, Crumb Cake, Real Red & Pool Party
Papers: Whisper White,Soft Suede & Pool Party CS, Fresh Prints DSP stack
Accessories: Scallop Tag Punch, Bird Builder punch, Dazzling Diamonds glitter and Crumb Cake ribbon.

And because I love you, contact me and I'll email you the instructions I have bought together from tutorials I have found on the internet!!

ScallopTag Punch Card

So, you would have to be a non-user of Pinterest to have not seen the popularity of the Tag Punch Card.  There are even Pin boards dedicated to this little card!!  So when we had our last Team catch up night, I thought it was the right time to give one a whirl!

I finally gave this card for a lovely friend of mine who had her birthday earlier this month.  So now it's time to share!  Ta Dah!  My version of the Scallop Tag Punch card!


I've used Pool Party CS as my base, added a layer of Basic Black and Whisper White CS for my panels.  I've used one of my favourite sets.... Regarding Dahlias and the ever so pretty French Foliage for some background stamping.


I've stamped in Pool Party and Pacific Point, two lovely shades of blue. You might also see a sneak peek of the new In Colour....  Lost Lagoon.  It's a lovely shade of blue and punches perfectly with a new punch!!  The Itty Bitty Accents punch!


I've tied off the card with some White Satin ribbon I had in my stash.  Such a pretty colour combination don't you think!

So here's what I used to make this card:

Stamps: Regarding Dahlias, French Foliage (retired) & Express Yourself
Inks: Basic Black, Pacific Point & Pool Party
Papers: Whisper White, Basic Black, Lost Lagoon & Pool Party CS
Accessories: Scallop Tag Punch, Itty Bitty Accents punch, gems & ribbon

To make this card you can find the online instructions here or send me a message - I would love to help!

My card inspiration was found here.

My card in a box

Finally, finally, finally!  I can show my Card in a Box which I made about a month ago.  I was able to hand-deliver it to my friend Beck this week as part of her birthday gift.  So it's with much pleasure I show today, my version of the very popular card in a box!


I used a colour combination of Smokey Slate, Pool Party, Coastal Cabana and Baked Brown Sugar.  Such cool colorus that work beautifully together.


I used a few different stamp sets for decorating the box card.  I used Flower Shop and the coordinating punch as well as the Petite Petals and coordinating punch.  Makes cutting so much easier!


All my pieces have been stamped onto Whisper White pieces.  I have used a few dies including the Little Leaves and Butterfly sizzlets.


I stamped Happy Birthday which I had coloured with markers (Smokey Slate & Bermuda Bay) onto a piece of Whisper White CS and then matted onto a scallop circle of Smokey Slate.  I added a little flower from Crushed Curry CS and a tiny little gem.


I used the Banner Blast and coordinating punches (love coordinating punches!!) as well as a banner cut from Eastern Elegance DSP.  Banners of course, overlaid onto crochet thread.


My card base was cut from Smokey Slate CS and used the Winter Frost Paper Stack (from the Holiday catalogue).  As you can see it folds up so you can put the card into an envelope.  I followed the instructions from the Stampin' T blog as her instructions are based on Australian sizes.   If you're looking for other sizes, just google/pinterest search Card in a Box.  There are so many designs to be inspired by!

Bokeh Technique

I love the Bokeh technique for photography.  I have an app on my phone that does it artificially but I haven't yet mastered the true technique for photography.  One day!

So when I saw the Technique form Splitcoast Stampers for Bokeh, well I just had to try.  I wish and wish I had the blue Gelato's they used in the tutorial, which I don't have, so I just used what was in my beginner stash of Gelato's!


I used my Gelatos (the four colours I have), my stamps and my Aqua Painter brush for this card.  I started by following the technique and stampin the background flower using Gelatos.  I then stamped the flower onto scrap and used the Gelato's and waterbrush to colour in.  The effect of that was OK, not as great as I hoped.


The fun part was using the pencil eraser to make the background.  I then scattered a few sequins to bring out the colours.  I can only imagine how pretty just blues would be!!


I added a few red rhinestones to the centres of the flower.  The photo's really highlighted the gems, which aren't so bright in real life. Weird!

So here's what I used:
Stamps: Flower Shop, Secret Garden & Express Yourself
Inks: Black Staz On
Papers: Whisper White CS
Accessories: Aqua Painter, Sequins, gems, Gelato's, Pansy Punch & Dimensionals

You can find the tutorial to do the Technique and the beautiful blues used in their example by clicking here.

Ombre with dots

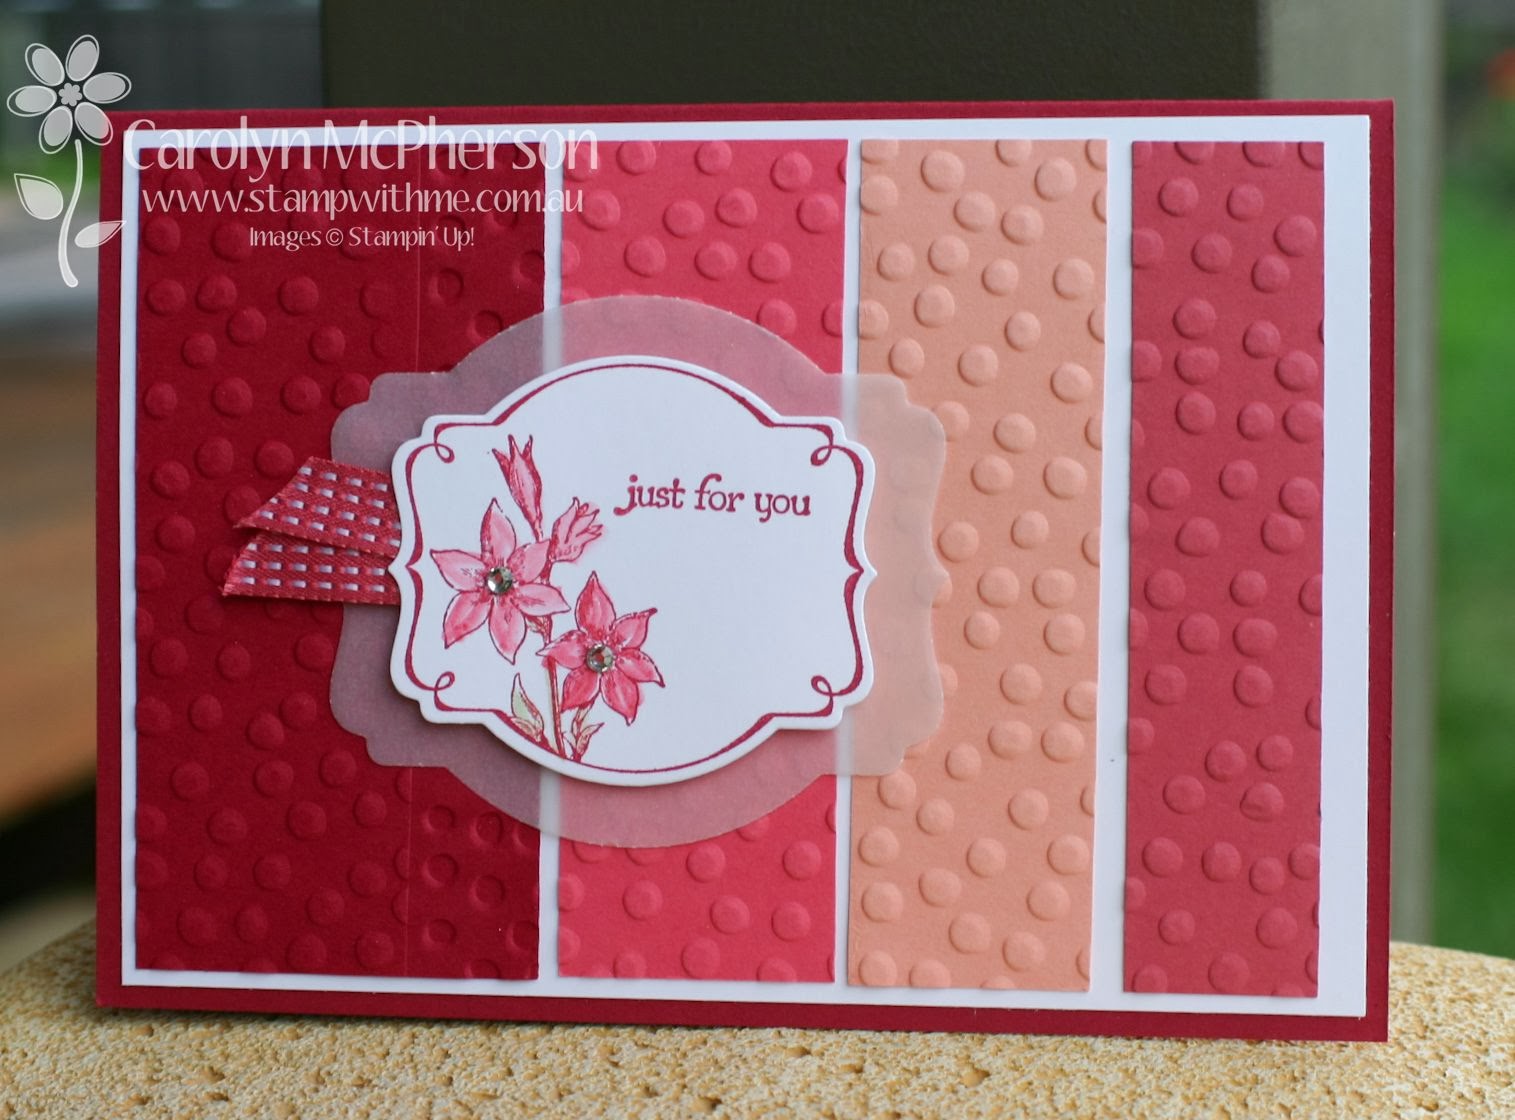
Eek!  It's five days since I last shared a project.  Where did that time go???  So it's high time I start sharing projects again, including this one we made at our Avid Inkers Team Meeting last week.  I love ombre and hadn't played with that effect for quite a while, so I was so excited to be making this card!!  This card was demonstrated by one of my lovely friends and she had given us instructions to bring a Raspberry Ripple card base and a Whisper White card front.   Hmmm, mysterious.  But now I can reveal!


Isn't it just divine!  I love these colours and would never have thought to put them together like this.

All the colours were cut into strips of varying width and embossed with the Decorative Dots Embossing Folder, free in this year's Sale-a-Bration!


We then made a pretty focal image using Vellum cardstock and then a matching little flower stamp (You're Lovely) also from Sale-a-Bration which we used our Blender pens to colour.  So cute!

So here's what we use:
Stamps: You're Lovely
Inks: Raspberry Ripple, Strawberry Slush & Pear Pizzazz
Papers: Raspberry Ripple, Strawberry Slush, Crisp Cantaloupe and Primrose Petals, Whisper White CS and Vellum CS
Accessories: Raspberry Ripple satin stitched ribbon & diamantes
Big Shot: Decorating Dots EF & Labels die

I did a google search too, and the inspiration of this card is found here: Too Cool Stamping

New - My Digital Classes


My Digital Classes & Giveaway!


Our My Digital Classes provide all the basics you need to make the most of our My Digital Studio product line. Take the classes yourself, or recommend them to interested customers and you'll discover just how quickly and easily you can create cards, pages, home décor and other projects with MDS, our intuitive design software.

We will continue to release new classes and coordinating exclusive digital downloads every month, on the last Tuesday of the month. Starting Tuesday, November 12, you can see all of our current classes in my Stampin' Up! store, where you'll find the item number, price, and description of the projects and techniques covered in each class.

Each class includes an exclusive digital download and instructional project-based video training that will guide users through a number of different techniques as they create a variety of projects in MDS. My Digital Class prices will vary depending on the content included.


So if you're like me and struggling to learn MDS, this is the perfect class for you.


More Butterfly Love

So a little while ago, well just over a week ago maybe, I shared a few of my favourite butterfly cards made with the Swallowtail Stamp.  It was Butterfly Love.  Well now I can share some more of my cards made with this stamp!

These cards were made during a class showcasing new techniques and for me, a very different but striking colour combination.  Elegant Eggplant and Crushed Curry.  Who knew!


The first card uses the technique of colouring in with Blender Pens.  The colours featured for the butterfly include Elegant Eggplant, Crushed Curry & Tangerine Tango.  Quite striking don't you think!


The card is deliberately layered so that the butterfly is bigger than the card.  Quite an illusion really as the card finishes up to be suitable for a regular envelope!


This second card, features clear embossing of the card and sponging with Elegant Eggplant card.  Not quite the way the original design was supposed to be, but a bit of adaption fixed that!  Don't you love the DSP in the background?  The Eastern Elegance DSP is stunning.


And I have to say, I really like this Chevron ribbon too!  So if you would like to make these cards, there is a coordinating box too as well as cards made similar to the ones shown in my Butterfly Love posts, please contact me.  Fabulous cards with great techniques!

So here's what I used:
Stamps: Swallowtail & Express Yourself
Inks: Basic Black, Elegant Eggplant, Crushed Curry & Tangerine Tango
Papers: Crushed Curry, Elegant Eggplant, Whisper White CS & Eastern Elegance DSP
Accessories: Crushed Curry 3/4" Chevron Ribbon, mini Silver brads, Blender Pens & Sponges


Ombre Card

I love the effect of Ombre.  The colour dipping, the colour shading and the contrast of colours.  So a while back when I showed the Avid Inker girls the ombre technique, I set about making my own card and never did finish it.  We used paper hand-cut feathers as the feature but I decided I didn't like it, so started again.

This time I used a flower die cut (the Chloe Stem) as the feature.  And this time it worked..... see for yourself!!


Eek, the colour looks a bit harsh in this photo but you can see I've created an ombre effect with the greens and the blues.  I've cut the colour strips and adhered them together with sticky tape on the back which allowed me to use my Chloe Stem Die to cut the flower out of this layer.  You can just see behind the two Whisper White die cuts, that I've cut out from the colour layer.

I've layered all of this onto a Whisper White CS card base and then adorned with gems, Linen thread and a stamped button made of the Simply Pressed Clay, coloured and glazed with Crystal Effects.  I've stamped with the little mosaic from the Mosaic Madness stamp set.

To make this card I've used the following:

Stamps: Teeny Tiny Sentiments & Mosaic Madness
Papers: Pear Pizzazz, Island Indigo, Marina Mist & Whisper White CS
Inks: Early Espresso
Accessories: Big Shot, Chloe Stem die (non-SU), gems, Linen Thread  & Simply Pressed Clay

Butterfly Love

So it's no secret I love butterflies!  So when the opportunity to use the gorgeous Swallowtail stamp occurs, love it I do.  Over the last few months I have been sharing/teaching a class based on the Swallowtail stamp.  Today I'm sharing two cards based on the techniques in this class but using my colour choices!

 My first card features the new In Colours of Baked Brown Sugar, Coastal Cabana and Strawberry Slush.  The colours mix beautifully and sparkle with all the Dazzling Diamonds I added!
 

 I've used Crumb Cake seam binding for a nice loopy bow and added a little banner using the Six Sided Sampler Stamp set.


The card is offset by a piece of Strawberry Slush CS.  So pretty!  The second card also uses In Colours, the latest in colours of Baked Brown Sugar and Pistachio Pudding, mixed in with Summer Starfruit.  I never thought I would love Summer Starfruit but I do!


I have edged the right wing of the butterfly with Pistachio Pudding CS and added a strip of Summer Starfruit DSP for contrast.
 

I loved making these cards.  If you would like the tutorial to make at home, let me know.  It's a gorgeous set with lots of fab new techniques!

Cascade Card

Sometimes birthdays are more 'special' then others.  Why we put significance on these, who knows but when these special birthdays come up - well, we just have to make something to remember!  So when a dear friend turned 40 recently, well a double tri-fold cascade card was in order!

There are lots of tutorials on YouTube and Technique sites, so I won't share the instructions here, instead click here for the tutorial I used.  You'll see from the photos, the technique is worth trying!!


 Apologies for the lighting.... I just couldn't get it right!  I used the feature colours of Groovy Guava and Baja Breeze for this card, based on this lovely floral DSP that I have and long retired (features a lot in my scrap albums though!).


The actual card base is Whisper White CS, with the first layer of Groovy Grava and then DSP.  I didn't have exact measurements for these layers, just used a ruler as a guide and made each layer about half a centimetre smaller than the last.  Not precise but worked well!


From the side angle, you can see the cascades come into play.  Each cascade has been decorated with flowers and butterflies, with a few overlaps but not so much so that I couldn't fit it into an envelope!


Of course, the front layer has the number 40 cut out from Silver Glimmer using the Big Shot and a little birthday banner.  Add lots of pearls and the card was done!

So when you're up to a challenge, have a try of this card.  The effects are beautiful!

Sunburst Card

Have you seen the Sunburst or Starburst cards out there in the world of blogs, Pinterest and beautiful websites?  I love them and have been itching to make one (or two or three.....) myself.  So after a little bit of googling, I followed the instructions to make my own card!  I followed Dawn Olchefske's tutorial and set to work!


I love love love this card.  I love the colours of the DSP, I love the effect of the sunburst and I love my little birthday embellishment too.  Love love love!


To create the Starburst effect, all you need is FOUR 1-1/2" x 4" pieces of paper. - See more at: http://dostamping.typepad.com/dostamping_with_dawn/2013/07/starburst-sunburst-card-video-stampinup-dsp.html#sthash.zDOJ1220.dpuf
I cut this gorgeous Eastern Elegance DSP into FOUR pieces, measuring 1 1/2" x 4".  Seriously, that's all you need.  The secret is in the cutting and you can follow Dawn's youtube video to see!  The pieces were cut on the diagonal, from one end to the other, creating enough pieces to make a sunburst.


To create the Starburst effect, all you need is FOUR 1-1/2" x 4" pieces of paper. - See more at: http://dostamping.typepad.com/dostamping_with_dawn/2013/07/starburst-sunburst-card-video-stampinup-dsp.html#sthash.zDOJ1220.dpuf


I just had to show a close up of the birthday sentiment.  It's so cute and totally inspired from our Mosaic Madness stamp class!

To make this card, I've used the following supplies:

Stamps: Itty Bitty Banners & Mosaic Madness
Inks: Pool Party & Basic Black
Papers: Whisper White & Pool Party CS, Eastern Elegance DSP
Accessories: White satin ribbon, Silver 1/8" ribbon, Circle & Itty Bitty punch, & rhinestone gem

Colour Blocking II

So the other day, I promised to come back and show you my second attempt at colour blocking.  I wasn't going to, as I really don't know if I liked this one, but I thought I better show that I have difficult card making days too!  Really :)


I think it might be my choices in colours used for the blocking technique.  I'm just not sure really, maybe the colours are too much of a contrast!


I've used a Night of Navy background for the card.  I love this colour, so useful for male cards too.  My colour blocking background colours are Pear Pizzazz, Daffodil Delight & Calypso Coral.  All great colours, maybe just maybe, not in this combination!


I've used a few little embellishments to finish off this card, as the main feature was the white embossed stamping over the background.  Love embossing, so much fun when I'm not making a mess of it (lol)!!

So here's what I used:
Stamps: Just Believe & Teeny Tiny Sentiments
Inks: Whisper White craft ink & Early Espresso
Papers: Whisper White, Night of Navy, Pear Pizzazz, Daffodil Delight & Calypso Coral
Accessories: Beautiful Wings sizzlit & Big Shot, White embossing powder, button & thread, and the window punch.


More Stained Glass Techniques

Well on Sunday I shared the card we made using the Stained Vellum technique and how beautiful the results are on an assembled card.  So of course, I had to make technique cards for the lovely girls in my team!  I've used different stamps and colours to the finished card to see what they would look like!

I love how the bright colours just shine through the vellum and it's so clever to think it's coloured on the back side and the white embossing is on the front side!


I love the contrast of the colours too.  Add a little leaf in another contrasting colour and they look gorgeous!


Technique cards and technique books are just one of the little things I like to do for the girls in my team, to show how much I value their friendship.  If you've been thinking about joining Stampin' Up! and would like to join a friendly team of girls, please contact me, I would love to share my journey with you.  For more info, click on this link.


LinkWithin

Blog Widget by LinkWithin
Blogging tips